How to store, manage, and expose values inside your indicators
In the last article, we broke down the basic structure of a NinjaTrader indicator. Now it’s time to start making your indicators do real work.
When you build custom indicators, you’ll quickly realize that not every value is hardcoded. Sometimes you need to store information privately inside your code. Other times, you want the user to adjust settings directly from the indicator properties window—without touching your script.
That’s where variables and properties come in.
In this article, we’ll cover:
- The difference between variables and properties
- Common types of variables in NinjaScript
- How to declare internal variables
- How to expose public properties to users
- How NinjaTrader makes properties visible using attributes
By the end, you’ll know how to make your indicators more flexible, customizable, and professional (this is only the beginning, so hang in there for more).
🔁 What Are Variables and Properties?
In NinjaScript (built on C#), variables and properties let you store and control information inside your script.
- Variables: Internal values used for tracking, calculating, and managing logic.
- Properties: Publicly accessible values that users can modify in the indicator properties UI.
Private vs. Public
When you declare a variable or property, you must choose an access level:
- Private: Only the code inside your indicator can access it. Use this for internal tracking.
- Public: Accessible by other scripts (like strategies) and visible in NinjaTrader’s UI if properly decorated. Use this when you want users or other scripts to modify or read the value.
Example:
private int internalCounter;  // Private - only used inside the indicator

[NinjaScriptProperty]
[Display(Name = "User Adjustable Period", GroupName = "Parameters", Order = 1)]
public int UserPeriod { get; set; } = 14;  // Public - user can set this in UI
Choosing between private and public is important: only expose what needs to be changed or shared.
Common C# Variable Types in NinjaScript
Before we start declaring variables inside our indicators, it’s helpful to get familiar with the common types you’ll work with. Most of what you’ll use in NinjaScript are standard C# types, but there are a few NinjaTrader-specific types too. Here’s a quick overview you can reference as you build your indicators:
| Type | Description | Example |
|---|---|---|
| int | Whole numbers | Number of bars to look back (e.g., 14) |
| double | Decimal numbers | Price levels, moving averages |
| bool | True or false | Toggle options like "Show Signal" |
| string | Text | Display messages or labels |
| Brush | Colors | Customizing plot colors |
|
Series | Specialized NinjaScript series of values | Price series, calculated indicators |
| const | Constant value, cannot be changed | A fixed threshold level |
🛑 What is a const?
A const (short for “constant”) is a value that never changes once your indicator is running. You define it once, and it stays the same every time your code executes.
Example:
private const double MaxThreshold = 100.0;In this case, MaxThreshold will always be 100.0—it’s locked in. You use const values when you need something reliable that doesn’t depend on user input or market conditions.
📦 Declaring Variables
To declare a private variable at the class level:
private int myPeriod = 14; // Internal use only
private double myMaxValue = 0.0; // Internal use only
To declare a constant value (unchanging):
private const double MaxThreshold = 100.0;If you want to track dynamic information like a running value per bar, you can use NinjaScript’s Series<T>.
In Series<T>, the T stands for the type of data you want to store. For example, Series<double> stores decimal numbers (like price levels), and Series<int> would store whole numbers.
You declare the Series<T> the same as other types:
private Series<double> mySeries;You’ll initialize Series<T> inside OnStateChange:
else if (State == State.DataLoaded)
{
    mySeries = new Series<double>(this);
}
Series<T> automatically manages a history of values bar-by-bar, so you can refer to past calculations easily. We’ll cover Series<T> more in depth in a future post.
🧭 Creating Public Properties
To allow the user to modify a setting from the UI, expose a public property using attributes.
[NinjaScriptProperty]
[Range(1, int.MaxValue)]
[Display(Name = "My Period", Description = "Period for custom calculation", GroupName = "Parameters", Order = 1)]
public int MyPeriod
{
    get { return myPeriod; }
    set { myPeriod = value; }
}
🔍 Explaining the Attributes
Before we dive into the details, it’s important to understand an additional concept: the difference between manually backing a property with a private variable versus using an automatic property.
You might see two different ways to create a property:
Option 1: Manual Property with Backing Variable
private int myPeriod;

[NinjaScriptProperty]
[Range(1, int.MaxValue)]
[Display(Name = "My Period", Description = "Period for custom calculation", GroupName = "Parameters", Order = 1)]
public int MyPeriod
{
    get { return myPeriod; }
    set { myPeriod = value; }
}
This structure gives you more control. You can later add validation, trigger custom logic when the value changes, or track when properties update internally.
Option 2: Auto-Property (Short Version)
[NinjaScriptProperty]
[Range(1, int.MaxValue)]
[Display(Name = "My Period", Description = "Period for custom calculation", GroupName = "Parameters", Order = 1)]
public int MyPeriod { get; set; }
This approach is fine for simple properties where you don’t need special behavior. It’s cleaner and faster to write but sacrifices flexibility.
When to use each:
- Use the manual pattern (backing variable) when you think you might add internal logic later.
- Use the auto-property when the value is simple and doesn’t need special handling.
📑 Understanding Property Attributes
When you create public properties in NinjaScript, you can attach special “attributes” that control how NinjaTrader displays and validates those properties. Here are the most important ones you’ll use:
[NinjaScriptProperty]
The [NinjaScriptProperty] attribute tells NinjaTrader that this property should be treated as an input when your indicator or strategy is referenced by another script. It ensures that the value can be passed in externally when your indicator is used inside another indicator, strategy, or add-on.
⚡ Important: [NinjaScriptProperty] does not control whether the property appears in the indicator’s settings window. That visibility is controlled separately by the [Display(...)] attribute.
You should use [NinjaScriptProperty] for core input values that impact logic and behavior — anything you would reasonably want to configure externally or programmatically. You typically do not use [NinjaScriptProperty] for purely cosmetic settings (like plot colors, line styles, fonts, etc.), because there’s no need to pass those values externally when calling the indicator.
Eample: Why [NinjaScriptProperty] Matters
If you don’t use [NinjaScriptProperty], your property won’t show up as an input when another script tries to reference your indicator.
✅ Correct (Accessible from Strategies and Other Indicators):
[NinjaScriptProperty]
[Display(Name = "Lookback Period", GroupName = "Parameters", Order = 1)]
public int Lookback { get; set; } = 20;
This allows another script to call:
MyCustomIndicator myInd = MyCustomIndicator(myInputSeries, lookback: 20);🚫 Incorrect (Missing [NinjaScriptProperty], Not Settable Externally):
[Display(Name = "Lookback Period", GroupName = "Parameters", Order = 1)]<br>public int Lookback { get; set; } = 20;<code><br></code>If you leave out [NinjaScriptProperty], the Lookback value won’t be passed in during a script call — it will always use the internal default instead unless manually changed later, for example:
MyCustomIndicator myInd = MyCustomIndicator(myInputSeries);[Range(min, max)]
Defines a range of acceptable values for the property. This prevents users from accidentally setting a value that doesn’t make sense (like zero or negative periods).
Example:
[Range(1, 200)]
public int Lookback { get; set; } = 20;
This restricts user input to values between 1 and 200.
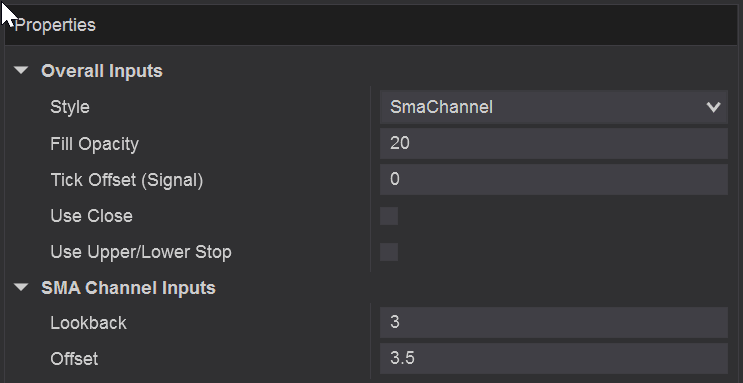
[Display(Name, Description, GroupName, Order)]
The [Display] attribute fine-tunes how your property appears in the NinjaTrader user interface. You can control multiple aspects:
- Name: This sets the friendly label the user sees next to the input field.
- Description: This adds a helpful tooltip that shows when the user hovers over the setting.
- GroupName: This organizes the property under a labeled section, like “Parameters” or “Settings” in the indicator panel.
- Order: This determines the position the property appears within its group.
Example:
[Display(Name = "Threshold", Description = "Signal trigger level", GroupName = "Settings", Order = 2)]This would place the setting under the “Settings” group, show it second within that group, and display “Threshold” as the label with an explanatory tooltip when hovered.
Using these attributes helps you create clean, user-friendly, and professional-looking indicators.
⚙ Setting Default Values
Defaults are set inside OnStateChange during the State.SetDefaults phase:
if (State == State.SetDefaults)
{
    Name = "MyCustomIndicator";
    MyPeriod = 14; // Default shown in UI
}
If you don’t set a default here, users could see an empty or incorrect value when loading your indicator.
🧪 Example: Full Property Setup
Let’s extend our MyCustomIndicator with a full start-to-finish example:
private int myPeriod;
private Series<double> mySeries;
private const double MaxThreshold = 100.0;

[NinjaScriptProperty]
[Range(1, 100)]
[Display(Name = "My Period", Description = "Lookback period.", GroupName = "Parameters", Order = 1)]
public int MyPeriod
{
    get { return myPeriod; }
    set { myPeriod = value; }
}

protected override void OnStateChange()
{
    if (State == State.SetDefaults)
    {
        Name = "MyCustomIndicator";
        MyPeriod = 14;
    }
    else if (State == State.DataLoaded)
    {
        mySeries = new Series<double>(this);
    }
}

protected override void OnBarUpdate()
{
    double average = SMA(MyPeriod)[0];
    mySeries[0] = average;

    if (Close[0] > average && average < MaxThreshold)
        Draw.Dot(this, "updot" + CurrentBar, true, 0, Low[0] - 1 * TickSize, Brushes.Green);
    else
        Draw.Dot(this, "downdot" + CurrentBar, true, 0, High[0] + 1 * TickSize, Brushes.Red);
}
In this example:
- The user controls “My Period” through the settings.
Series<double>stores the average at each bar.MaxThresholdensures we aren’t drawing signals when the SMA gets too high.
🧰 Best Practices for Variables and Properties
- Always back public properties with private variables.
- Use
[Range]to restrict invalid inputs. - Set safe defaults in
State.SetDefaults. - Group inputs logically using
GroupName. - Only expose properties the user should control.
- Use
constfor fixed, unchanging internal values. - Be thoughtful about when to use
[NinjaScriptProperty]—don’t expose visual-only settings.
Example of clean grouped properties:
[NinjaScriptProperty]
[Display(Name = "Enable Signals", GroupName = "Settings", Order = 1)]
public bool EnableSignals { get; set; } = true;

[NinjaScriptProperty]
[Range(1, 50)]
[Display(Name = "Lookback Period", GroupName = "Settings", Order = 2)]
public int LookbackPeriod { get; set; } = 10;
🧩 What’s Next?
Now that you understand how to manage variables, properties, constants, and series, you’re ready to start building real visual outputs.
In the next article, we’ll cover Plots and Data Series—how to visually display your indicator values on the chart.
Let’s turn that data into something you (and your users) can actually see!ee!
🎉 Prop Trading Discounts
💥91% off at Bulenox.com with the code MDT91
