Understand when your indicator or strategy does what — and why it matters.
In our previous article on Variables and Properties, we covered how to store and manage information inside your NinjaTrader indicators and strategies.
Now, it’s time to step back and look at something even more fundamental: when your code runs, and why different parts of your indicator or strategy behave differently depending on the stage of execution.
Almost everything you build in NinjaTrader will revolve around understanding OnStateChange() — the method that controls how your script moves from setup, to processing market data, to shutting down.
In this article, we’ll walk through:
- What
OnStateChange()is (in plain English) - A table of each major
Statewith practical explanations - What kinds of code belong in each
State - Why understanding historical vs. real-time matters
- Common mistakes new coders make (and how to avoid them)
By the end, you’ll know how to set up your indicators and strategies correctly — and avoid bugs caused by running code at the wrong time.
Additional Resources:
Before we dive deeper, here are two official NinjaTrader Help Guide links you may want to bookmark. These explain OnStateChange() and the overall NinjaScript lifecycle directly from NinjaTrader’s documentation. They’re great to reference as you continue learning and building more complex scripts:
🚪 What is OnStateChange()?
In simple terms:
OnStateChange()is a method that NinjaTrader calls whenever your script moves to a new stage of its life cycle.
When your indicator or strategy loads, NinjaTrader automatically walks it through specific stages, called States. Each State gives you a place to set things up, get ready to process data, handle real-time trading, or clean up after yourself.
Why it matters:
Some things should only happen once (like setting defaults or adding plots). Other things should happen when you start receiving data. OnStateChange() is where you organize all of that — cleanly and safely.
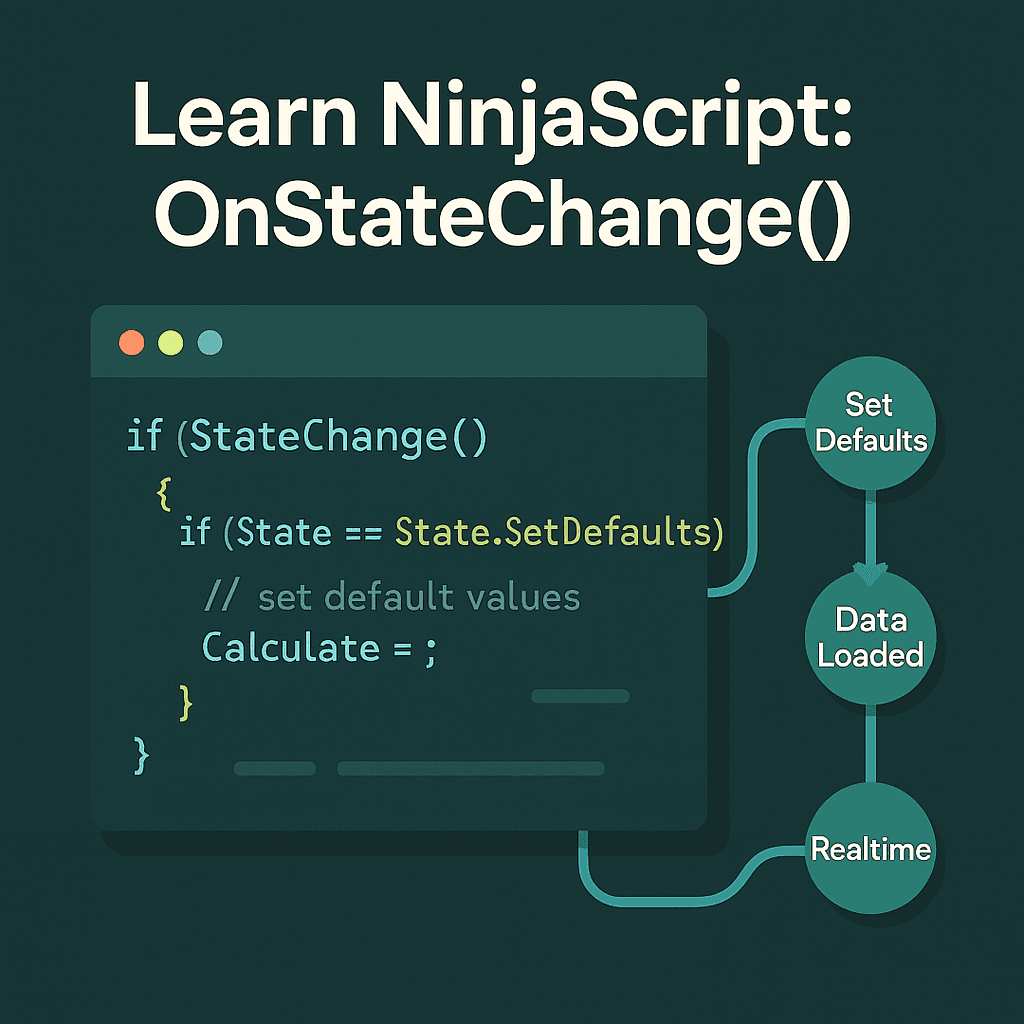
🛠 Common Lifecycle States (and What They Really Mean)
Here’s a table of the most important State types you’ll work with:
| State Name | Plain English | When It Happens | What You Usually Do Here |
|---|---|---|---|
| SetDefaults | "Tell NinjaTrader my defaults." | Before the user even applies the indicator or strategy | Set default property values, define initial plots, control Calculate mode. |
| Configure | "Now configure data series and custom setup." | After the user clicks OK/Apply, once per lifetime | Add custom data series, dynamically add plots if needed. |
| DataLoaded | "All my data is loaded, I'm almost ready." | After all data is loaded |
Instantiate custom Series |
| Historical | "I'm processing historical bars." | Starts running historical data | Optional: Detect if you want to act differently for historical data. |
| Transition | "I'm switching from history to live data." | After last historical bar, before first real-time tick | Set flags to prep for real-time trading. |
| Realtime | "I'm now processing live, real-time data." | When real market data starts | Start executing your full real-time trading logic. |
| Terminated | "I'm shutting down." | When the script is removed, chart closed, etc. | Clean up resources, unsubscribe from events, dispose objects safely. |
🔥 Most Common States You’ll Use (90% of the Time)
SetDefaults: Always used. Set your initial property values and plots.Configure: Often used if you’re adding custom data series (like multiple instruments).DataLoaded: Used for setting up calculated series, loading internal indicators.HistoricalandRealtime: Very useful when you want to run different logic based on whether you’re processing past or live bars.Terminated: Always recommended if you need to clean up, especially if you create custom UI elements or subscribe to events.
🧩 Deeper Dive: What Belongs in Each State
📋 State.SetDefaults
“What should my indicator or strategy look like when the user first sees it?”
In this state:
- Set your default input values (like periods, thresholds, toggles)
- Define how your indicator will calculate (
OnBarClose,OnEachTick,OnPriceChange) - Add plots that you want visible and editable in the UI
- Set general display preferences (scale justification, draw on price panel, etc.)
Example:
if (State == State.SetDefaults)
{
    Name = "MyCustomIndicator";
    Calculate = Calculate.OnEachTick;
    IsOverlay = false;

    AddPlot(Brushes.Green, "BuySignalPlot"); // Appear in UI for user customization
}
✅ Tip:
Plots added here become editable by the user in the indicator settings window. If you dynamically add plots later (like in Configure), they won’t show up in the UI!
⚙️ State.Configure
“Get me ready to start loading data.”
In this state:
- Add extra data series (
AddDataSeries()) - Dynamically add non-editable plots if needed
- Prepare anything that needs to be created before bars start processing
Example:
else if (State == State.Configure)
{
    AddDataSeries(BarsPeriodType.Minute, 5); // Add a secondary 5-minute series
}
📚 State.DataLoaded
“All my data is here. Let’s set things up!”
In this state:
- Instantiate
Series<T>variables - Load or initialize any internal indicators (e.g., SMA, ATR)
- Access things like
Bars,BarsPeriod,Instrument,TradingHours, etc.
Example:
else if (State == State.DataLoaded)
{
    mySeries = new Series<double>(this);
    mySma = SMA(14); // Internal indicator ready to go
}
✅ Tip:
If you’re using Series<T> or internal indicators, you should initialize them here.
🕰 State.Historical
“I’m processing old historical data.”
You may want to do things differently for historical bars than live bars.
For example:
- Collect historical statistics
- Avoid live alerts (like playing sounds) while backtesting
- Pre-calculate averages or threshold levels
else if (State == State.Historical)
{
    isHistorical = true;
}
🚀 State.Transition
“I’m about to go live!”
Use this to:
- Reset certain values or series to prep for real-time
- Start timers, notifications, or tracking real-time metrics
else if (State == State.Transition)
{
    isHistorical = false; // No longer historical after this
}
📈 State.Realtime
“I’m now live trading!”
This is where you can:
- Turn on alerts
- Start executing full-size positions
- Begin any aggressive trading logic you avoided during historical
else if (State == State.Realtime)
{
    inRealTime = true;
}
✅ Example Scenario:
If you use Calculate.OnEachTick, you might want an indicator to only draw live signals after bars are building in real-time, not from historical backfill.
🛑 State.Terminated
“I’m done. Time to clean up.”
When the user removes your indicator or closes the chart:
- Dispose of any Series, timers, subscriptions
- Clear UI elements (like custom toolbar buttons)
Example:
else if (State == State.Terminated)
{
    if (ChartControl != null && toolbarButtonAdded)
        RemoveToolbarButton();
}
🧠 Why You Might Track Historical vs. Real-Time
Sometimes you want your indicator to behave differently based on whether it’s processing past data or current live ticks:
- Alerts: Don’t fire audio or email alerts on historical bars.
- Real-time trading logic: Only take actual trades when live.
- Graphical Markers: Avoid clutter from historical drawing objects if you only care about new signals.
✅ Pro Tip:
Set a simple flag (isHistorical) during Historical, clear it during Realtime. Then you can check this flag inside OnBarUpdate().
if (isHistorical)
    return; // Don't execute live-only logic
📋 Full Example OnStateChange() Template
protected override void OnStateChange()
{
    if (State == State.SetDefaults)
    {
        Name = "MyCustomIndicator";
        Calculate = Calculate.OnEachTick;
        IsOverlay = false;
        AddPlot(Brushes.Green, "BuySignalPlot");
    }
    else if (State == State.Configure)
    {
        AddDataSeries(BarsPeriodType.Minute, 5);
    }
    else if (State == State.DataLoaded)
    {
        mySeries = new Series<double>(this);
        mySma = SMA(14);
    }
    else if (State == State.Historical)
    {
        isHistorical = true;
    }
    else if (State == State.Transition)
    {
        isHistorical = false;
    }
    else if (State == State.Realtime)
    {
        inRealTime = true;
    }
    else if (State == State.Terminated)
    {
        if (toolbarButtonAdded)
            RemoveToolbarButton();
    }
}
🧰 Best Practices for OnStateChange()
- Keep
SetDefaultsvery lightweight — no heavy logic. - Never add data series or instantiate indicators outside of
ConfigureandDataLoaded. - Always initialize Series<T> and custom indicators inside
DataLoaded. - Use flags like
isHistoricalorinRealTimeif you want different behavior. - Clean up resources in
Terminatedif you create anything dynamic.
🧩 What’s Next?
Now that you understand when and where NinjaTrader expects your setup code —
we’re ready to move into OnBarUpdate() — where the real “trading” and “signal generation” magic happens!
See you in the next lesson!
🎉 Prop Trading Discounts
💥91% off at Bulenox.com with the code MDT91
